
NBA Live 2000

Page Last Updated: 2/22/17
64-bit Windows Installation
Table of Contents:
3. Adding Registry Keys
4. Replacing NBAWIN.exe / nGlide Patch Install
5. Configuring nGlide
6. Additional Troubleshooting at the Message Board
Notes About This Page
*These instructions are intended to be used with the English language version of NBA Live 2000. They *may* work for other regions, but this is not at all guaranteed.
*The in-game menus might be a little distorted, but you can still navigate them.
*For the sake of brevity, this page assumes you have some intermediate-level knowledge of Windows, File Explorer, folder structure, and the registry. It will often tell you 'what' to do as opposed to 'how' to do it. If you need help with how to perform any of the actions described, please leave me a note on the message board and I will be happy to walk you through.
1. Copying Files from CD
Like Lives 98 and 99 before it, NBA Live 2000's setup program is a 16-bit app, which means the installer will not run under 64 bit Windows.
The good news is, the game itself can still be made to work without the setup program, even on Windows 10.
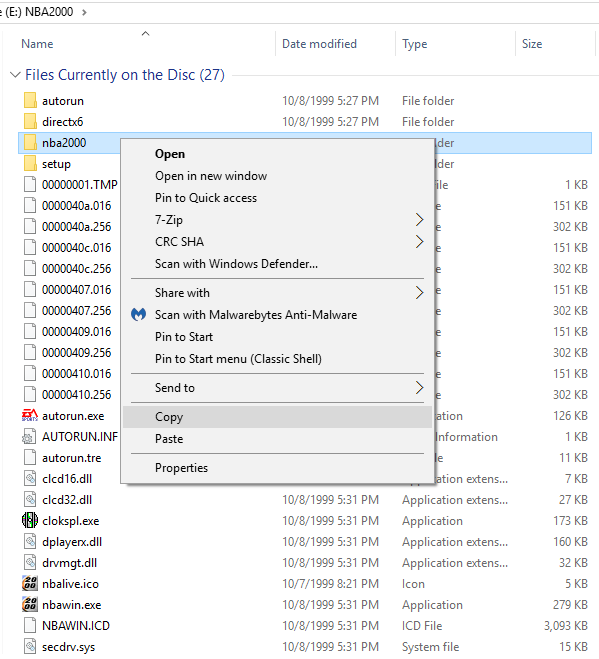
To begin, insert your NBA Live 2000 game CD and open your CD drive in File Explorer. Highlight the "nba2000" directory and copy it, either by doing a CTRL-C or by right clicking and hitting copy from the drop down bar.

Next, I strongly recommend you create the following path on your hard drive.
C:\Games\Sports\
The idea is to paste the nba2000 directory *inside* of the "Sports" subfolder, so that the game path becomes C:\Games\Sports\nba2000. You don't absolutely have to follow my directory structure, but doing so will make future steps easier and reduce the chance of a problem occurring.
2. Adding install.dat
Install.dat is a required game file which is automatically generated by the setup program during installation. Since 64-bit users cannot use the regular installer, I'm providing this file here.
Inside this file is a reference to the user's CD-ROM drive letter, and the game will not run if this letter does not match that of your CD drive. Please download the version of install.dat which matches your CD-ROM drive letter.
Download install.dat (CD drive D)
Download install.dat (CD drive E)
Download install.dat (CD drive F)
Download install.dat (CD drive G)
Unzip the file to your nba2000 game directory.
3. Adding Registry Keys
Now we need to install the registry keys for the game.
As with the install.dat file, the registry keys include a reference to the user's CD-ROM drive letter. Download the version which corresponds to your CD drive.
Download the Registry Key for CD Drive D:
Download the Registry Key for CD Drive E:
Download the Registry Key for CD Drive F:
Download the Registry Key for CD Drive G:
Once downloaded, you will need to double-click on the .reg file in File Explorer and click yes at the ensuing popup to add the information to your registry.

But first, a couple of notes:
I have the game set up to use Glide graphics, so make sure you have the nGlide glide wrapper installed on your system beforehand.
Also, there is a line inside the registry key that is particularly important:
"Install Dir"="C:\\Games\\Sports\\nba2000"
This line HAS to match the directory you copied the game to. If you copied the game to a directory other than C:\Games\Sports\nba2000, you will have to open the .reg file in Notepad and alter this line to reflect where you have the game installed.
To do this, right click the .reg file in File Explorer and hit "edit." This will pop up the Notepad program. Make your changes - once done save the file and exit Notepad.
As before, double click on the .reg file in File Explorer to add it to the registry.
4. Replacing NBAWIN.exe / nGlide Patch Install
Next, we need to head on over to the Zeus Software page:
nGlide Compatibility List Link
Scroll down to the NBA Live 2000 entry and look for where it says:
To play you must run 'nba2000.reg', replace 'nbawin.exe' and install patch from here
Click on the HERE to download the needed files. Unzip the included NBAWIN.exe to your nba2000 folder and replace the original one. Then, run the "PatchInstall.bat" to install the database patch. This is needed for multiprocessor computers.
5. Configuring nGlide
By now you should have done everything needed to launch the game (crossing fingers), but it's worth taking a moment or two to examine the nGlide configurator, as this program is what will actually be controlling your graphics output, rather than the in-game settings.
Once you install nGlide, the configurator have been added to your start menu, inside the nGlide folder.

The most important setting here is the screen resolution. By default, this is set to "by app" which means nGlide will try to use the resolution settings set within Live 2000 itself.
By specifying a custom setting here, you can improve the game's visuals drastically -- just be sure to use modes your monitor supports. "By desktop" is typically a safe setting, as it will set the game to whatever resolution you use on your desktop.
The other options can safely be left on default settings, but you may wish to turn off the 3Dfx logo splash screen which pops up every time you start the game.
Speaking of starting the game....try doing that now. :)
6. Additional Troubleshooting at the Message Board
Hopefully, you're up and running. If you do run into problems, the first thing to try is setting the nbawin.exe to run in administrator mode.
If issues persist, or if you just have a question or comment about NBA Live 2000, please leave a note at the message board.